
The effect and durability of waterproofing for buildings depend on different factors. This includes one of the most important factors, i.e. the selection of the correct waterproofing system depending on the type of water load. It is the correct classification of the load that allows sustainable functional waterproofing of buildings.
Restoration of bitumen subsurfaces
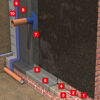
Subsequent outer water proofing that has contact with the ground requires greater care during planning and implementation. After exposing the part that needs to be waterproofed, the type and quality of the existing waterproofing needs to be assessed. In the case of bitumen-based old waterproofing, the firm connection to the subsurface needs to be checked before work is commenced, and any loose, adhesion-inhibiting components need to be removed. It is only necessary to completely remove the old waterproofing in some cases. To cater for the moisture load in the wall-sole connection, the old waterproofing in this area needs to be completely removed down to the mineral subsurface. The new hybrid waterproofing MB 2K is an easy way to create a effective bonding course and an optimum adhesive bonding between new and old waterproofing.
1 Remove the old coating
All the old waterproofing in the heavily exposed area at the footing needs to be removed down to the mineral subsurface.
2 Preliminary work
Break the edge of the projected foundation. Adhesion-inhibiting constituents must be completely removed.
3 Priming
Apply Kiesol (1:1 with water) evenly. Pre-wet heavily absorbent subsurfaces with water.
4 Bonding course
Apply the Kiesol bonding course with WS Sulfatex within the response time.
5 Equalisation
Equalise all unevenness with WP DS [basic] in a wet-on-wet method.
Subsequent waterproofing of mineral subsurfaces
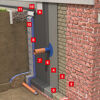
One of the most reliable solutions for subsequent restoration of a wet cellar is to waterproof the outside cellar wall that has contact with the ground. The WTA information sheet 4-6-12/D ‘Subsequent waterproofing of parts that have contact with the earth’ contains explanations about installing this kind of waterproofing. In addition to the detailed damage and/or building diagnostics and the preparatory steps for the subsurface, the information sheet also addresses the various sealing materials like polymer modified, bituminous
thick coating or mineral water proofing grouts. For decades, Remmers has been supplying product systems that precisely match the WTA specifications. Numerous restoration reference objects demonstrate the optimum interaction of the system components made of mineral waterproofing grouts, water proofing filler and the bitumen-based surface water proofing. Waterproofing also needs to withstand the high requirements in the base area. This is where a variety of loads come together. Waterproofing must be positive fitting and reliable in the base zone / splashwater areas, transition area and areas that have contact with the ground. This means that, according to the familiar Remmers method, the splashwater areas in the base need to be waterproofed with mineral grouting systems that are highly sulphate-resistant, then a safety zone with an overlap of at least 20 cm needs to be created and the areas that has contact with the earth needs to be sealed to the optimum with PBD 2K.
1 Preliminary work
Break the edge of the projected foundation. Remove the adhesion-inhibiting components.
2 Priming
Apply Kiesol (1:1 with water) evenly. Pre-wet heavily absorbent subsurfaces with water.
3 Bonding course
Within the reaction time of the Kiesol, apply WP Sulfatex as a bonding course in a “wet-on -wet” method.
4 Equalisation
Equalise all unevenness with WP DS Levell in a wet-on-wet method.
5 Tight cove
Apply a tight cove with WP DS Levell using a tight cove trowel in a “wet-on -wet” method.
Exterior waterproofing
5 products foundView:


Article No. 043025
Rigid mineral waterproofing grout with high resistance to sulphate


Article No. 417601
Reinforcement fabric made of E-glass with polymer plastic sheathing